You may think, why pinewood when there are better-looking, stronger and even more durable types of wood out there. Let us tell you something, the other categories you are talking about, they are not cheap; in fact, they are way out of the league for some people.
But let me put you in on a secret, when you stain pinewood, it looks like one of the most expensive wood. This may sound unbelievable, but it’s not.
Do you think your friends out there on Facebook suddenly won a lottery and bought or made furniture out of oakwood, Ebony-Wood or Pink Ivory-Wood?
Maybe they did, or perhaps they know our little secret. There is a high chance they have the best stain for pine in their arsenal because would you waste a ton of money to get something when you can have a similar thing at a cheaper rate? We think not.
So, if you want to know the entirety of the secret, go through our extensive article about pine stain and how to use them.
Top 10 Best Fence Saw list:
| Image | Product | Details | Price |
|---|---|---|---|
 |
Ready Seal 510 | Item Weight: 1 pound Product Dimensions: 12 x 12 x 13.75 inches Material: Oil-based Color: Golden Pine Part Number: 510 |
Check Price |
 |
Minwax 213104444 | Item Weight: 10.2 pounds Product Dimensions: 2.88 x 2.88 x 3 inches Material: Wood, Polyurethane Color: American Chestnut Part Number: 213754444 |
Check Price |
 |
General Finishes | Item Weight: 1.15 pounds Product Dimensions: 3.38 x 3.38 x 3.88 inches Material: Water Based Color: Walnut Part Number: WWPT |
Check Price |
 |
Varathane 224455H | Item Weight: 13.6 pounds Product Dimensions: 1.58 x 0.78 x 1.58 inches Material: Oil-based Color: Cabernet Part Number: 224501 |
Check Price |
 |
Varathane 262012 | Item Weight: 2 pounds Product Dimensions: 4.25 x 4.25 x 5 inches Material: Liquid Color: Ipswich pine Part Number: 262012 |
Check Price |
 |
Minwax 618604444 Color | Item Weight: 2.48 pounds Product Dimensions: 8.75 x 8.75 x 5.1 inches Material: Wood Color: White Wash Part Number: 618604444 |
Check Price |
 |
Varathane 262031 | Item Weight: 10.4 pounds Product Dimensions: 2.88 x 2.88 x 2.88 inches Material: Oil-based Color: Ipswich Pine Part Number: 262031 |
Check Price |
 |
Rust-Oleum Zinsser 854 | Item Weight: 1.99 pounds Product Dimensions: 4.15 x 4.15 x 4.9 inches Material: Liquid Color: Clear Part Number: 854 |
Check Price |
 |
Rust-Oleum Zinsser 304H | Item Weight: 1.99 pounds Product Dimensions: 4.15 x 4.15 x 4.9 inches Material: Liquid Color: Clear Part Number: 304H |
Check Price |
 |
Minwax 618514444 Water | Item Weight: 2.29 pounds Product Dimensions: 4.25 x 4.25 x 4.88 inches Material: Madera Color: Transparent Part Number: 618604444 |
Check Price |
Best Stain For Pine Reviews
Here we have listed all the top-notch products available in the market. Have a look.
1. Ready Seal Golden Pine Exterior Wood Stain (Editor’s Choice)
Ready Seal 510, the number one product on our list, is at the top for a couple of reasons. First of all, it serves not one but two purposes at the same. The product works as a stain and sealer; therefore, it doesn’t require the addition of a primer or conditioner.
On the other hand, the oil-based formula of the stain allows it to penetrate deep into the wood pore to provide ultimate protection. The product is outstanding when it comes to resisting water. It also prevents mildew and mold buildup, which ensures the safety of wood from rotting. The stain can also resist the UV lights to prevent discoloration.
Ready Seal 510 is a semi-transparent stain, which doesn’t hide the natural look of your pinewood. It will enhance the existing appearance of the wood while allowing the end grain to bloom more brightly.
The stain is extremely easy to use as it can be applied with a roller, brush, or even a sprayer. You can also apply the stain at any temperature. Furthermore, the product doesn’t require any wet-line application or back brushing, eliminating any sort of annoyance while staining.
The stain comes in a variety of colors; so, you have the option to choose one that suits the best with your entire design. After reviewing all these features, we cannot but announce the product as the best stain for pine.
2. Minwax 213104444 PolyShades Honey Pine Satin (Best Value)

The stain comes in a variety of colors; so, you have the option to browse through some of them to find the right one for your pinewood. Once you apply the product, it will enhance the grain of your wood with an elegant finish rich with satin.
It will also provide polyurethane protection, which keeps your wooden structure safe from the harsh elements of the environment and allows it to last for a very long time.
Additionally, the stain can be used over other finishes. Thus, even if your deck or furniture has an existing finish, it doesn’t matter because you can simply apply it without worrying about ruining the wood.
On the other hand, the product dries quickly. You will only need 15-20 minutes or a little more to have a complete finish. It also cleans or removes mineral spirits on the wood for increased convenience.
One thing you should keep in mind is that the product is interior use only. You can stain pine floors, walls and even household objects. Nonetheless, it can work like a charm for interior items, and it is possibly the best stain for pine floors.
3. General Finishes Water Based Pine Wood Stain (Premium Pick)

First of all, the product is able to provide a vibrant dark appearance to your wooden structure. You can either apply it by hand or by using a sprayer. The former option will result in a perfect finish but maybe time-consuming whereas, the latter method makes the staining process fast and effortless.
On the other hand, the tint does not leave a powerful odor. It consists of a low volatile organic compound to keep your wood safe. So, you needn’t worry about a strong smell or accidental flames.
Additionally, the product is quite similar to oil-based stains. It comes with a thick consistency, which assures proper penetration to reduce blotch marks on softwood.
Finally, the cleaning process is also seamless, as you will only need water and soap. It makes cleanup cheap, easy and effortless. The special walnut pine stain is preferable to many homeowners because the look you will get will be simply amazing.
4. Varathane 224455H Premium Gel Stain, Quart, Ipswich Pine

Like all the other stains, this one also augments the inherent beauty of the end grain with vibrant deep colors that are sure to last for years. It does not fade quickly; so, you will not have to go buying around a new pot every now and then.
Another unique thing about the product is that it can be applied without causing grain raise or lap marks. It has a decent drying speed, and you can cover 250 sq. feet of area with one coating.
On top of that, it is produced with a thick consistency, which enables it to avoid drips or accidental runs. Usually, stains tend to drip all over the place, but with this one, you will not have to face the problem.
The 224455H is designed for vertical objects or surfaces like doors, fences, window trims and much more. You can see its full potential with such objects. Judging by its features and quality, it is possible to assume the product is the best stain for pine fence.
5. Varathane 262012 Premium Fast Dry Stain, 32 oz, Ipswich Pine

Honestly, there is not a lot of difference between the previous product and this one. This one is also suitable for interior wood projects such as staining trim, cabinets, floor, doors and paneling.
It has also been enhanced with nano pigments to assure high performance and draw out the innate wood grain. It highlights the grain to bring out the beauty of the timber.
Additionally, one coat of the product is enough to get the maximum tone. You won’t need extra layers to have the perfect appearance. Furthermore, a single coating can is sufficient enough to cover an area of 275 sq feet.
It dries way too quickly, sometimes faster than you want it to be. However, it will be touchable after only 1 hour. With the product, you will be able to seal the pores of your wooden structure, and if you want additional durability and protection, use an extra coating of Varathane Polyurethane.
6. Minwax 618604444 Color Wash Transparent Layering Color, White Wash

The greatest thing about the product is that you’ll be able to apply it on water-based or even oil-based stain. It comes with special properties allowing it to be compatible with bare wood or any kind of paint.
It will gently stain wood that is untampered, and leave a transparent yet visible color. It is able to soften the appearance of stained pinewood. Moreover, the water-based tint allows the natural grain to appear while giving a refined shade of white to wooden structures.
With one coat of the tint, you will be able to cover 100 sq feet of timber. It only takes a stain-pad and a foam or synthetic brush to use the product.
It comes in three stylish colors and one better than the other. The manufacturers claim that the product is able to dry completely in 1 hour; however, you should leave it to dry for 2-3 hours for the greatest results. It is a water-based formula; thus, you will be able to clean it up with water and soap.
7. Varathane 262031 Premium Fast Dry Wood Stain, 1/2 Pint, Ipswich Pine

It has been enhanced with nano pigments, which makes it high-performing and reliable. The pigments provide brilliant grain highlighting and ultimate color quality. They bring out the inherent elegancy of the wood.
Furthermore, the product features a unique base, allowing it to dry super-fast while sealing the surface too. It takes one hour to dry completely, and with one coating, you will be able to cover 70 sq. feet.
On the other hand, you will only need one coat of theproduct to acquire maximum color due to the previously mentioned nano pigments. With the help of the advanced formula, you have the power to apply a polyurethane only after an hour of drying.
Finally, you don’t need any wood conditioner to use the tint. It is effortless to use, and you don’t have to be a professional.
8. Rust-Oleum Zinsser 854 1-Quart Bulls Eye Sealcoat Universal Sanding Sealer

An interesting thing about the product is that it is compatible with all kinds of sealers, especially the clear ones. It is an excellent choice if you are planning to seal interior wood, such as floors or compartments inside the home.
Furthermore, it dries in a matter of minutes and once dried, it can be recoated and sanded. The paint of the stain does not turn yellow or darken even after years of usage.
You can easily clean it up with a mixture of water and ammonia or alcohol. On the other hand, the product offers additional warmth and elegancy to water-based polyurethanes.
Nonetheless, you can use the product as a pre-stain conditioner for softwoods and pinewood. The multi-purposeful product can also be used as a bond coat for relatively new finishes. Moreover, the product is the best stain for pine siding; so, it got that covered for you too.
9. Rust-Oleum Zinsser 304H 1-Quart Bulls Eye Clear Shellac

It is a clear transparent sealer that is able to draw out the inherent beauty of any wooden structure. Additionally, it intensifies the color of the timber and gives it a shiny appearance that does not yellow or darkens with time.
The product is easy to use and does not contain any harmful chemical ingredients. It only uses organic components, making it safe for both users and their items.
On the other hand, it dries within a few moments, and you can recoat it only after 45 minutes. The product is an excellent protective sealer for home projects and crafts. It assures a flawless finish to wooden items, panelling and wood trim.
Overall, the tint can keep your timber look shiny and safe from environmental threats. It will be able to preserve your most valuable art, metal and even statuary.
10. Minwax 618514444 Water-Based Pre-Stain Wood Conditioner

The first thing you need to remember is that it is not a tint; therefore, it won’t work like one. You will use the product to prepare your timber for staining and to prevent any type of streaking or blotching. Using the product will ensure an even appearance on your wooden structure.
Afterward, the product is quite budget-friendly and can cover an area of 100-125 sq feet with just one coating. It also dries in a matter of minutes, and for the cleanup, you will only need some water and soap.
The tint is extremely easy to work with anduse; so, you won’t need any prior experience. You can use it before applying water-based or even oil-based tint. In a nutshell, if you want the perfect color from Minwax items or to stain pine, then the conditioner is a must for people like you.
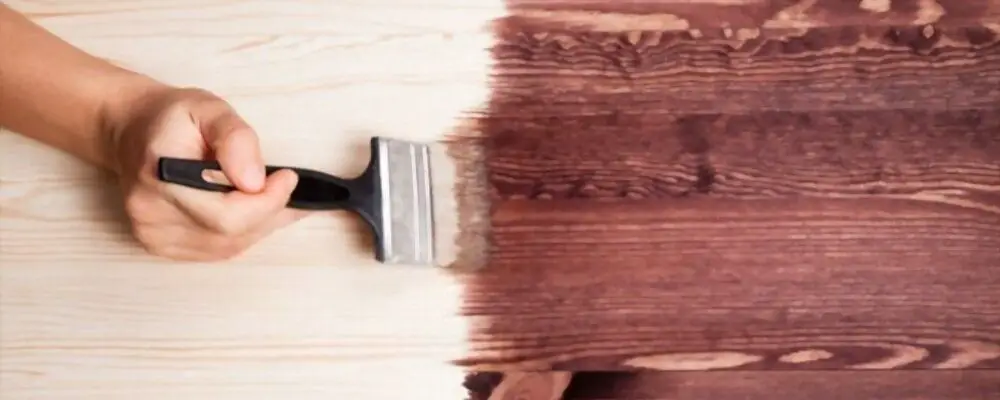
How to Stain Pine
It is more difficult to tint softwoods than hardwoods. For instance, pines have an uneven fiber structure and soft texture, which makes the application quite challenging. Thus, you must follow some necessary steps to ensure even staining. Your success rate will be based on how you follow them.

Sanding and Sealing the Wood
Step 1:
You will first need to start with low-grit sandpaper, let’s say around 100-grit. Now sand the surface in a looping, wide circular motion. Your first task would be to wear down small ridges, contours and knotholes of the softwood. (Based on the pressure requirement, you can also use a sanding-block)
Step 2:
Once you are done the first time, use finer sandpaper of 150-200 grits for the second sanding process. It will ensure the exterior is prepared and blended for tinting.
Step 3:
Your next task of the project is to take a wet sponge and wipe it across the timber with heavy strokes. It will take out the loose debris and dust and also return the fiber.
Step 4:
Next, use a pre-stain conditioner or a sealant on the exposed areas of the lumber. You will have to use them on the ends, too, if the item is a board-like object. After the initial coating, use a second one to ensure the proper distribution of the sealant.
Step 5:
Wipe off the extra conditioner with a cloth. Once you are done wiping, make sure there is no standing moisture or wet spots left on the project area.
Step 6:
Now simply leave the board or timber to in a cool, low humid place for drying. Wait for 2 to 3 hours to avoid any blotchy messes.
Applying the Stain
Step 1:
Afterward, choose a stain (make sure it is suitable for pinewood) and take a chisel-tipped brush or cloth. Soak them in the tint pot and begin sweeping on the wooden structure back and forth or in eccentric circles. The strokes should be smooth, and if you want to spread it on hard to reach areas, using a sponge brush can be very helpful.
Step 2:
Keep sweeping or brushing the tint on the board in all directions until it has spread along the edges properly. Continue the process till you see a consistent, faint coloration.
Step 3:
Wait for 2-3 minutes for everything to soak in, then remove the excessive tint from the lumber with a piece of cloth. It is very crucial to wipe off all wet spots from the work area.
Step 4:
Wait for the first layer to be dried to the touch. It may take 24 hours or more for it to be dried up completely. Do not use more coats till then, as it will result in an unattractive, muddy finishing.
Step 5:
Now, based on your desire or requirement, add a second or even third coating of tint until you find the perfect coloration. Just make sure you are not overdoing it because once applied, there is no coming back.

Finishing the Wood
Step 1:
Check the wood to ensure if it is parched. You can inspect it by tapping the surface with your fingers or paper towel. If you see even the slightest of tint coming off then, you should know it is still wet.
Step 2:
Once you are sure the piece is dried, use a microfiber cloth to remove any debris or dust buildup. Avoid rubbing the board with excessive pressure.
Step 3:
Use additional coats of sealants if you want to protect the stained lumber from wear, tear or moisture. Any varnish, lacquer or polyurethane sealer can do the job.
Step 4:
Wait 24 hours for the additional clear coats to be dried up completely. You should not move the piece around while it is in the process of drying. Water-based stains will parch faster than oil-based tints. So, if you are in a hurry, you can always go for the former.
Before You Stain Pine
There are a few things you will need to know and do before tinting a piece. Check them out if you don’t want to mess up anything.
Look Begore You Leap
First of all, you should get familiar with the items and the application process before moving on to the actual project. You use a piece of scrap to conduct your practice sessions. Keep practicing until you feel adjusted to the entire system. Afterward, stain wood without worrying.
Fix Loose Knots
Staining knotty pine is a tough job. Sometimes you will notice some small knots or gaps on your piece of lumber; so, you will have to fill them up with epoxy before you sand or stain pine. After setting it up, even out the exterior with sandpaper.
Sand Thoroughly
Start by using a sand block. You will end up with swirl marks if you use orbital sanders. After the process of power scraping and before you move to the next grit, sand with a block and with your hands.
Keep changing paper from time to time. Pinewood will gum up regular sandpaper with dust, which will make the paper useless very quickly. A dull paper does not cut the fibers; instead, it makes them uneven and gives a muddy appearance. Therefore, use serrated sandpaper, which is sure to last much longer.
Raise the Grain
Sandpapering may leave out some fibers. If you use a water-based product, the fibers will swell up, eventually leaving a rough surface. Thus, raising the grain is crucial if you want smooth results.
Two Coats of Conditioner
Afterward, you need to use water-based conditioners as it will allow the dye to be applied smoothly. It will partially seal the wooden structure, limiting the penetration of the dye.
You should use at least two coatings to prevent blotching. Once it dries properly, smoothen the exterior with a paper of 400-grit, be careful around the edges and contours.
Two Coats of Dye
Mix the dye powder with hot water. You will find the proper ratio at the product’s label section. When the mixture is complete, pour it in a container and allow it to cool down.
You can use a brush or spray to spread over the dye. Let the first layer penetrate for a few minutes. Afterward, let wipe it off and allows the timber to parch. You can repeat the process after a while. Using two coatings will provide a uniform appearance and deeper coloration.
Two Coats of Shellac
Shellac will prepare the piece for glazing. Additionally, it seals the pitch in the timber. You should use two coatings of shellac for perfect sealing. Remember to smoothen with a paper of 400-grit after each layer.
Apply Glaze
You can make your own glaze with artist oil and glaze-medium. You don’t need to be specific about the ratio. Glazing gives an additional layer to the pinewood and makes it look glamorous.
Topcoats
Finally, you have to use a transparent topcoat to protect all the layered finishing. Our only tip is that you allow the glaze to be dried completely. By following the steps, you can stain pine with ease.
White-Based Stains and Tints
Such stains give an elegant white finishing and bring out the visible grain of pinewood. Whitewash tints are exceptional for such lumber, and they are able to provide a brighter and lighter hue to pinewood items while toning down the yellow appearance. There are also a variety of shades available such as green, blue, peach, rose, gray, yellow and beige with white-based tints.
Homemade Natural Wood Stains
If you ever wondered how to stain pine dark brown with a minimum cost then, there is an effortless way for you to exploit. You can create tints with everyday household items that can give your timber a dark look.
Ingredients such as coffee, tea and vinegar mixed with materials like rusty nails, steel wool and copper nails allow you to create a tint suitable for pinewood.
For instance, steel wool dipped in vinegar forms a tint, which will provide a stunning gray-toned patina on pinewood.
Wax Finishes
Now that you know how to darken pine wood without stain, let us look at the wax finishers. Wax products are excellent alternatives to polyurethane sealers. It allows the lumber to preserve its true colors and repel moist buildup while filling the pores and giving it a hard finishing.
Wax tints are not that durable; therefore, you will need to add a few coatings to ensure durability. You should use wax on an existing tint if you want optimal results.
Adding Color Depth with Glaze
It is not always appropriate to add multiple coatings as it may do more harm than fix. If you want to have a more in-depth and darker tone for your wooden items, you can always spread over a glaze on the exterior.
With a mixture of glazing medium and artist’s oil paint, you will be able to produce a toner or glaze. Once you are done applying a sealer on your wooden structure, wipe the glaze evenly. Use a small paintbrush to brush the toner along the exterior and wipe it off with a fresh rag.
Finishing Pine Wood Knots
Before applying any type of tint, you must seal all the knots in the wood with a wash-coat or shellac. The sealant prevents bleeding of the resins and pigments in the knot. Color bleeding is widespread; thus, if you don’t want it to ruin your project, use a suitable sealant.
What is Pine Wood Used For?
Pinewood is used for many outdoor and indoor wood-working projects. It is durable, versatile, reliable and looks fantastic. Usually, indoor items made out of pinewood doesn’t require much protection. You will only need to use a transparent varnish or lacquer along with a pre-sealant to have good-looking and long-lasting wall paneling, floors or wooden objects.
On the other hand, outdoor items such as decks, window frames, sidings, and patio structures will need pressure-treated pines or ones that are painted with latex as it will protect the items from the harsh elements of weather.
Is Pine Good Wood for Furniture?
It is a fantastic type of timber for household items due to its soft nature. The softness allows it to be carved and designed seamlessly.
However, it doesn’t mean that pinewood can’t take a punch because it is shock-resistant, sturdy and durable. Such lumber can take in stain smoothly, but you need to cover it with a sealant first.
Pines are excellent for making household items like bedroom sets, dining tables, chairs, or any solid piece. It is cost-efficient wood capable of meeting a tight budget while providing outstanding quality based on how you treat it.
How to Finish Pine Floors?
Pinewood doesn’t come pre-finished like hardwood, especially the floors. Therefore, you will need to follow the tips mentioned down below.
The items that you will need to complete the floor are stain, oil or varnish. The process is quite simple, actually. First, you will need to vacuum the entire work area to ensure no dust or debris remains before tinting.
Afterward, smear a layer of stain on the floor. Wait for it to be dried entirely and add the next one. After a period of 24 hours, you will have to use a tint, oil or varnish for sealing up the floor. Wipe the place with a rug or cloth when it is parched, and you are done.
Best Way to Finish a Pine Wall
Pinewood walls or paneling is quite famous these days. Moreover, the process of sealing them is also straightforward and simple. Check out the tips down below to tint your own pinewood wall.
Prepare the Room: Start with removing as many objects as you can from the room or the work area. If possible, keep the windows open and turn the fans on for proper air circulation. Besides, if you don’t want to ruin the floor or the carpet, lay down a few sheets.
Even the Wall: Before moving on to the tinting project, you will need to even out all the knots and small holes of the pinewood. Using epoxy mixed with sawdust is an excellent way of doing it.
Sand the Pinewood: Start with smoothing the wall with sandpaper of 100-grit. However, if your pinewood is already sanded then, use a finer paper of 200-grit to tone up the wall.
Using a Conditioner: Prepare your wall for tinting by applying a conditioner. You can use more than one layer, depending on your preference. Make sure to read the terms listed on the back of the product before using it.
Stain the Wall: Choose the tint you want on your pinewood and spread it over in the direction of the fiber. Wait for the first layer to be dried thoroughly before using another one.
Sealing the Pinewood: Afterward, smear a thin layer of a sealant based on oil to the pinewood. Make sure your brush strokes are smooth and long.
The Second Sandpapering: Allow the sealant to parch properly. Next, use sandpaper of 220-grit to smoother any imperfection or remove any excessive tint. Sweep off the pinewood to clean the remaining debris or dust.
Spread the second layer of sealant on the wall and wait for it to parch.
Polishing the Wall: Use clean cloth or rug to polish the pinewood. It will make the wall shiny and bright.
Additional tips: do not use any type of wet clothes, even if it is clean. Make sure to check out the conditions and privacy policy of the items you get before using it.
Difference Between Shellac, Varnish and Polyurethane
Polyurethane is not the most common finish yet quite famous and desirable for its unique features. It is quite similar to shellac and unable to withstand chemicals or excessive heat. Therefore, it is mostly used for indoor projects.
On the other hand, shellac and varnish are more popular as sealants for pinewood. Shellac appear shinier and brighter than varnish; however, it requires a few coatings to get that perfect look. It is also lighter than varnish.
On the contrary, a varnish is more durable than both shellac and polyurethane. It is dense; therefore, it requires only one or two coatings. A varnish is excellent for outdoor woodworks due to its protective capabilities.
What Are the Different Types of Pine Wood?
Unlike other types of timber, pinewood is quite soft; therefore, it is easier to work with it. There are four major categories of pinewood available, have a look.
Northern or Eastern White Pine
Such pinewood is suitable for indoor items like carpentry, chair, table and much more. However, they are too soft and cannot be used for building or home construction.
For the most significant results, you should use varnish or polyurethane with such timber as it brings out the original exquisiteness of it.
Deal Pine
Such timber can be found in Northern Asia or Europe. It is available in both yellow and red varieties. Additionally, it comes with a unique fiber pattern, which makes is excellent for wall paneling, doors and household items.
Nevertheless, to protect the exterior of the pinewood, you should use polyurethane or varnish. It will give you the ultimate results and bring out the highest quality of the timber.
Southern Yellow Pine
This is the cheapest among the four types of pinewood. It is strong and dense, and as the name suggests, it is somewhat yellow-colored. The timber is ideal for a bunch of DIY projects and construction due to its sturdy build.
If you want to achieve the prime appearance of the pinewood, use a dark brown or red stain.
Blue Pine
Such pinewood features a blue-colored hue, which may also look a little grayish or brownish. It usually happens due to a special fungus living inside the timber. Blue Pine is famous for its strength and ability to bear a high load.
The most annoying thing about the pinewood is that it doesn’t take in stain like the other ones. It tends to keep the blueish look even after tinting. Thus, using a transparent varnish or lacquer is the key to have a perfect look with it.
You can also check out the images on Pinterest to have a better idea of the different types of pinewood. It may help in selecting a one for your home.
How to Treat Unfinished Pinewood Furniture
Unfinished pinewood comes with its own advantages and disadvantages. It comes with a rustic appeal and weathered look, which makes it a product of choice for everyone. However, it is a type of softwood, thereby susceptible to damage, cracking and even discoloration.
The only way to avoid is to follow some basic steps. Check them out to be on the safe side.
- As it is vulnerable to shrinking and cracking from moisture and extreme heat, you should keep the wooden pieces in dry, cool spaces.
- Always keep the pinewood away from dirt by cleaning it with a fresh cloth every once a week. It will prevent wet dirt or dust from entering the fiber of the timber.
- You may use a damp but clean cloth to remove oily substance or dirt. Make sure the rug is not wet.
- When you find parched spots that may lead to cracking, spread on a layer of wood oil with a fresh new rug to prevent it.
- You can also use protective wax to keep your pinewood safe from any elemental damage.
How to Finish Pine Outdoor Furniture
Here are the steps to go through the entire process.
Setting up the area: Make sure you have enough space where you are working and keep proper ventilation.
Choosing a Finish: If your pinewood has not been pressure treated, then use an oil-based or gel stain. If it is not the case, go for latex paint.
Sanding the Pinewood: Smoother the exterior of the piece to ensure even and proper penetration of tint. Use sandpaper of fine and high grit.
Priming the Piece: Use a sprayer to spread over a thin layer of conditioner or primer on the pinewood. Let it parch for 30-60 minutes.
Tinting the Pinewood: According to your preference and desire, use two or even three coatings. Your brush strokes should be smooth and long. Additionally, always allow the tint to parch before adding another one.
Sealing the Pinewood: After tinting the piece, use a varnish or sealant for the final sealing process. A single layer is usually enough for the task.
Frequently Asked Question (FAQ)
Q: How do I stain pinewood a consistent color?
Clean the pinewood with a damp cloth. Let it be dried up, then use a dye of your choice. Let the dye stay for a day. Afterward, use a varnish or shellac for sealing the piece. Use a pigmented tint over the sealant. Continue the process if you want a darker appearance.
Q: What Kind of Wood is Pine?
Pinewood is very common, and it can be found in Northern Hemisphere. It is basically softwood that is harvested from a coniferous tree. There four major types of pinewood. It comes in gray, yellow, blue and even white.
Final Notes
Pinewood, like any other wood, has the capability to décor your home in a brilliant fashion. It may have a cheap appearance and weak structure in a few cases, but with a little bit of staining, it can look remarkable and hold out for many years.
In our review of the best stain for pine, we have tried to cover everything there is to know about pinewood and staining. If you have gone through them properly, you should know how to stain pine to look like oak or any other expensive wood.
You are done with learning our secret. Now, it’s time to use it and show off on Facebook or Pinterest that even you own some sleek wooden decks and furniture.
